Frequently Asked Questions
How do I control content in my Word report template?
Managing Content of Reports
For all standard reports the ###RoofDrawing will usually be sufficient. However, with new developments, the operator can now control the appearance of the attributes of the roof as they appear on the report using ###RoofImage[n].
NB: Recent updates to MS Windows, imposed upon users of Windows10 by Microsoft, has trashed one of the image import translators for EPS format files (among other things). It happens that the ###RoofDrawing uses an EPS file to get the roof plan from Roof Wizard to MS Word. Without that translator, the Roof Wizard crashes. Perhaps the easiest fix for you is to change the ###RoofDrawing to ###RoofImage[n] on your Word or Excel templates as described below. We do have an FAQ on this site that explains how to get the EPSIMP32.FLT file back, but it requires the user to edit the Windows Registry.
The key-text-string for this option allows the operator to control the level of annotation applied to the roof drawing. For example, you might require dimensions, roof slope/pitch and Line types. This can be achieved by setting the ‘switches’ as shown below, in the combination that you require for the desired output.
The following list summarises what is included on the drawing of the roof model.
Additional annotation Switch
Roof planes ‘on’ 1
Display Walls 2
Panel layout/Block layout/Offcut layout 4
Dimensions 8
Roof Pitch/Slope 16
Line type 32
Flashing annotations 64
Battens/Purlins 128
Course lines 256
Downpipes 512
Section Details Report 1024
Block-Cutting 2048
Roof plane areas 4096
To get the desired combination you add the value of the switches together. So if you wanted to reproduce a roof drawing on your report that included pitch and dimensions n=8+16=24, and your key text string would be ###RoofImage[24].
For flashing annotation and downpipes on the same roof drawing, n=64+512=576 and the key text would be ###RoofImage[576].
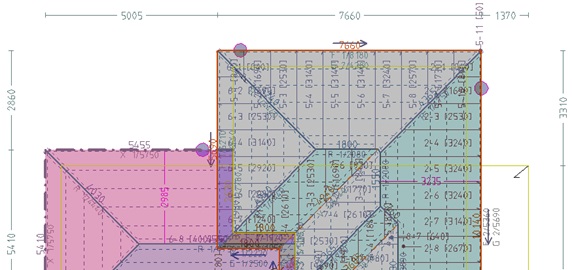
In the example below we have roof planes, walls, panel layout, dimensions, downpipes you would need n=1+2+4+8+128+215 = 675 - ###RoofImage[675]
All the required information must already have been placed on the 3D model, and this would normally be the case during the development of your job. The exception to this are pitches/slopes and linetypes, as these are normally not left with the model, they typically only used during checking. If they are not in the model and you select them for the report, they will be added for you before it processes the key text string.
This provides a lot of additional control over the appearance of your reports and the level of detail you wish to provide your customers and installers. You can go simple with ###RoofDrawing or complex with ###RoofImage or ###RoofImageC – the ‘C’ denotes constrained as it will not auto-rotate.
Before the roof plan is inserted into the report usng ###RoofImage(n), AppliCad creates a separate file of the roof drawing called RoofImage.TIF (a bitmap image file) based on the current view of the 3D model, that is at the time you select the Reporting > Supply+Install screen, and select [Print]. If you want a plan view, have plan view displayed. If you want perspective or ISO view, select those views BEFORE you select Reporting > Supply+Install.
Auto-Rotate View
The program utility that combines the various roof drawings with the Word report template looks at the style the target document and will perform additional functions as required. It only works with Word templates. The view of the roof may be inserted into the Word design elements of table, text box or shape.
The key text ###RoofDrawing will scale as required, but will not rotate the model image. It will be auto-scaled to the size of the shape or text box unless otherwise controlled as described in the preceding section.
If you decide to place a table element into the Word template to define the placement of your drawing detail you must set the height AND width of the table cell to suit your template design. All drawing types (other than ###RoofDrawing), such as ISORoofDRawing, sheet layout or flashing layout etc, the software will auto-scale and auto-rotate to best fit the extents of the defined cell.
If you use Word design elements such as shapes (typically rectangular) or a text-box, the drawing will auto-scale, but NOT auto-rotate. These are limitations of MS Word and not anything AppliCad can control.
back