Frequently Asked Questions
How do I set and/or check the location or file path of the ...User folder on my network? My data files seem to have disappeared. Check file path settings.
Setting the Network File Sharing Location
The software is a single user license product – one license, one user. However, the software is network aware and allows you to save work on a shared network server drive so that printers, material definitions, settings and user created job files may be shared with other users. If you are not sure about this, engage your IT guy to help.
First off, install your Roof Wizard software on the local C:\ drive. The default folder is C:\AppliCad\Roof Wizard\... This allows for the most efficient operation and fastest response times. It works best this way and if you have a solid state drive as drive C:/ it runs even better. Also as much RAM as you can get - 16Mbyte is optimum, 8Gbyte is more than adequate.
The default user folder location is C:\AppliCad\Roof Wizard\User.
Setting the Network Drive for Sharing job files
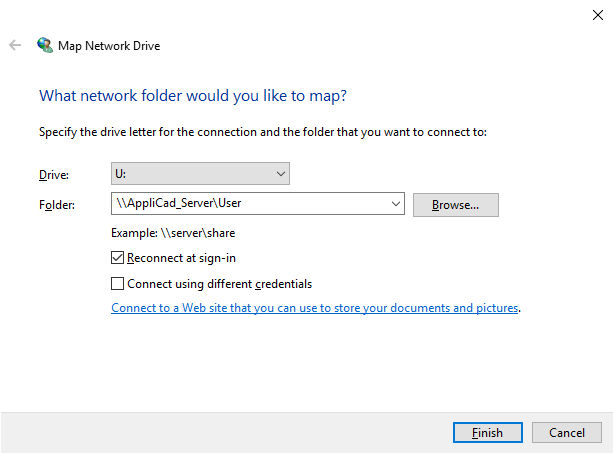
If you do not have a network folder to work in you need to create it, then you will map the network drive on your server. So, step one, create a folder on your server where you want the AppliCad data to live, and give that folder a meaningful name. For reasons not relevant here, keep the name short. Next you map the drive so that it has it's own drive letter, for example - Z:\AppliCad\User.
Windows 10
Map a network drive - to get to it from File Explorer in Windows without having to look for it or type its network address each time, or share it with other Roof Wizard users.
-
1. Open File Explorer from the taskbar or the Start menu, or press the Windows logo key + E.
-
2. Select This PC from the left pane. Then, on the Computer tab, select Map network drive.
-
3. In the Drive list, select a drive letter. Any available letter will do in our example we will use Z:\ (if it is free to use).
-
4. In the Folder box, type the path of the folder or computer, or select Browse to find the folder or computer. To connect every time you log on to your PC, select the Reconnect at sign-in check box.
-
5. Select Finish.
Now you are ready to set up the paths for the Roof Wizard to work in this folder.
-
Note: If you can't connect to a network drive or folder, the computer you're trying to connect to might be turned off, or you might not have the correct permissions. Try contacting your network administrator.
Windows 7
Map a network drive, to get to it from Computer or Windows Explorer without having to look for it or type its network address each time, or share it with other Roof Wizard users.
-
1. Open Computer by clicking the Start button and then clicking Computer.
-
2. Click Map Network Drive.
-
3. In the Drive list, click any available drive letter (if it is free to use). In our example we will use Z:\ .
-
4. In the Folder box, type the path of the folder or computer, or click Browse to find the folder or computer. To connect every time you log on to your computer, select the Reconnect at logon check box.
-
5. Click Finish.
-
Note: If you can't connect to a network drive or folder, the computer you're trying to connect to might be turned off, or you might not have the correct permissions. Try contacting your network administrator.
Checking the folder path settings
There are two situations where you will need to check the file paths -
A: a brand new installation on a corporate network with shared data and job files, or if you are working on a shared network and you navigate away from the the set ...\User folder location to open another file.
B: If you navigate away from the set path to open a job file or seek an image underlay file, the Roof Wizard software remembers that path.
In the latter situation, you may not notice immediately, but little things will give you a clue - like the fact that when you try to open an old job, it is not listed, or your materials and labour files seem to have disappeared, or the colour scheme has changed. All these things indicate that the software has lost the set path to the default settings. Simply closing the software and restarting will normally fix this.
However, if it doesn't fix it, you need to check further.
To check and/or set the paths for the software to look in the correct location for its data - there are four locations where you need to check/set the file path.
Note: If you are not sharing files on a network, then the default location is C:\AppliCad\Roof Wizard\User. You can also use the following steps to check that the software is pointing to this location instead of the example used.
____________________________________________________________________________________________________________________
Step 1:
The first check is the Roof Wizard shortcut icon on the desktop
Right click on the desktop shortcut and select Properties > Shortcut, change the Start-in location to the shared drive path previousy defined. In our example it is Z:\AppliCad\User. Your path will almost certainly will be different to this. If you're not sure, consult with your IT support guys.

Step 2:
Checking the folder path in AppliCad.ini in the ..\Programs folder...
Close the Roof Wizard software (if open). Open Windows Explorer; navigate to the Roof Wizard programs folder (normally this will be C:\Applicad\Roof Wizard\Programs) and open the AppliCad.ini file using a text editor such as Wordpad or Notepad (right click the file and select Open With...).

Go to the line - TempDirectory and change the path to a valid location which would be Z:\AppliCad\User in our example.
Change the Default Directory to the same location as defined above and the Temp Directory to the same but with \Temp added on the end.
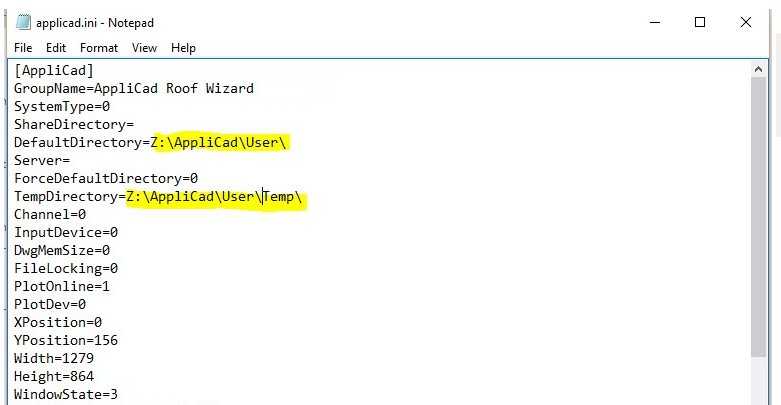
The Temp folder is where Roof Wizard saves temporary files that are only used to develop panel layouts and quotes etc. It is useful to periodically go to this folder and clean the files out. If they are required again, the software will recreate them.
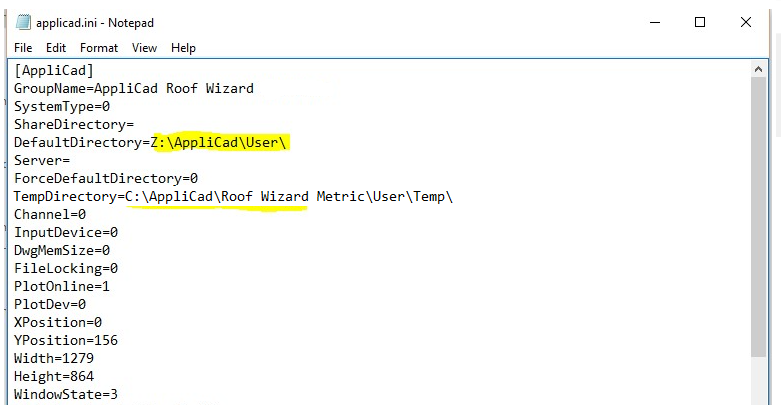
NOTE: The Roof Wizard performance has been observed to suffer quite markedly with this change in some situations, related to the bandwidth or performance of the network connection. Testing has shown that if we set the temporary folder to the local C drive, almost all local drive performance is restored while still enjoying the benefits of shared data and job files. Check the path here as well as the Preference Settings as described below.
Step 3:
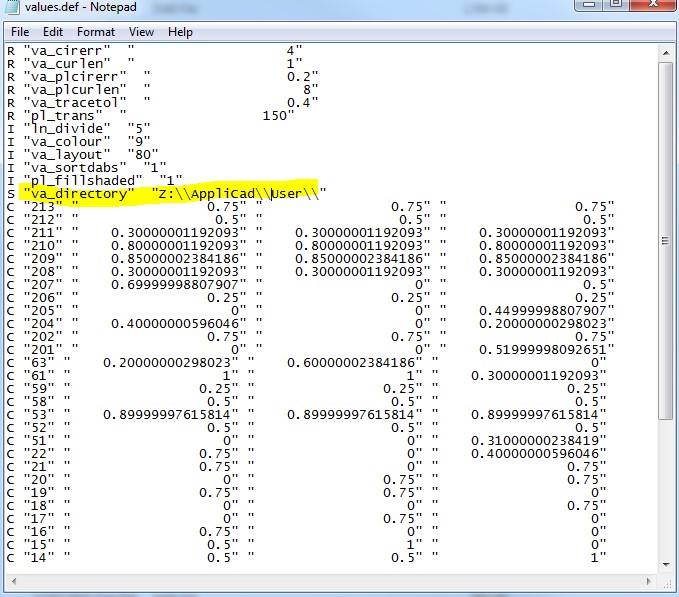
Checking the folder path in Values.def in the User folder...
Once you have checked the paths in AppliCad.ini, you will next go to the Z:\AppliCad\User folder location and you will see a file called Values.def (if the software install is brand new it will be created with first use of Roof Wizard).
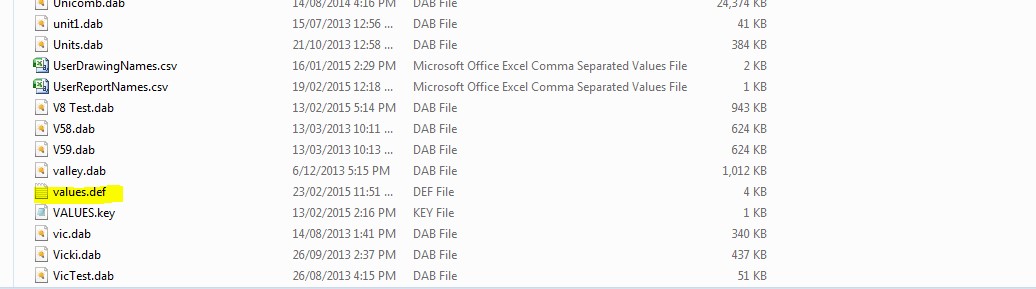
As we did above, right click the file and select Open with and select Notepad. Change the va_directory to match, note the use of the double back slashes separating the folder names - that is just what the Values file needs and is unique to Values.def.
Checking the Path in System Preferences
Lastly you will open up the software and go to Set Up > Preference Settings > System Preferences from the Pulldown menu:
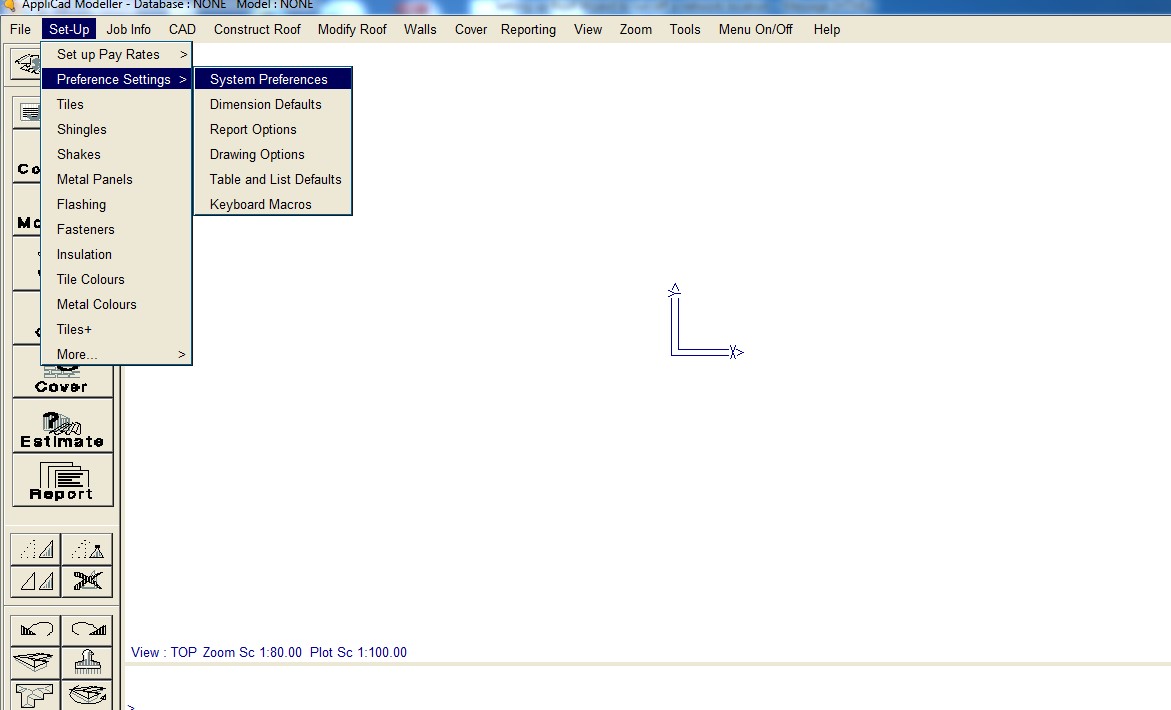
The User Settings and Corporate Data folders path should be set to Z:\AppliCad\User and the Temporary folder path should be set to Z:\AppliCad\User\Temp in our example.

You are now ready to do your work, have it saved on the network server. Your files will now be available to be shared with other users and should also be included in the automatic office backup.
NOTE: As explained above, the Roof Wizard performance has been observed to suffer quite markedly with this change in some situations, related to the bandwidth or performance of the network connection. Testing has shown that if we set the temporary folder to the local C drive, almost all local drive performance is restored while still enjoying the benefits of shared data and job files. Check the path in this dialog box as well as the AppliCad.ini as described above.

So a periodical clean out of the C:\AppliCad\Roof Wizard\User\Temp folder is recommended once this configuration has been setup.
File Locking
To prevent other users from opening a job while you work on it, running the risk of overwriting or corrupting your job, you should also set file locking.
From the Pulldown menu, select CAD > Defaults > System Settings > Setup. In the dialog box displayed, select File Locking and set the path for the lock files. This will need to be done on all PC's using the shared drive.
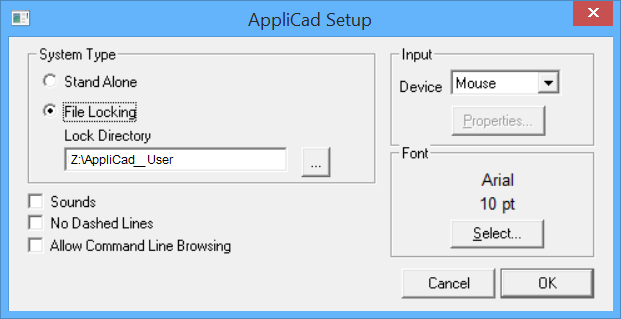
Select OK, and the setting will be saved.
back