Tutorials
Setting up your installation of V5.8
There is quite a bit to digest. So that what we have done makes sense to you and you can fix yourself up to run as before, we have included a lot of explanation to the detail.
As every customer site has small variations on their software setup, it was not practical to try to do this setting up stuff automatically. We also didn’t wish to wreck their working version of V5.7 in an attempt to do it automatically.
So here goes…
Background
As you may be aware, the release of Windows Vista and Windows 7 has changed the way the operating system works for computer users. It tends to overwhelm most people with the extraordinarily high levels of file security that are apparently for our own benefit. It is fair to say that the incidence of virus and low level ‘hacking’ seems to have reduced in recent years. In any case, for regular computer users, the overhead is very high and the level of knowledge to manage it is beyond most of us.
To simplify the use of our software we have changed the folder path for the installation in an attempt to get ‘back to basics’. The new version, V5.8 installs into its own folder structure directly off the root folder of your C: drive – C:/AppliCad/<program name>/Programs. All your user data – jobs and material files – are usually located in C: drive – C:/AppliCad/<program name>/User.
After installation you have a further option of setting up a Corporate folder so that material definitions and job files can be stored on a shared/mapped drive on the server in the office, say a “Z:” drive and the individual operator settings (screen colours etc) will still be in the local drive under C:/AppliCad/<program name>/User. You set this up under Tools > More…>System Preferences once the data has been setup and the software installed.
A further wrinkle is the fact that we have added options to several files so that you have greater control over certain materials and items. For example you now have an option to define material ‘Gauge’ or thickness for flashing and trim. This has added a column in the data file so the old data file with your data in it needs to be converted to the new structure. There are several files with similar small enhancements that will be converted automatically for you.
Typical Situation
Since new installations require some data files for new users to practice with, we ship the software with some data files with sample data and materials specified. These are in the C:/AppliCad/<program name>/Programs folder. So when you first start up the software and you haven’t copied your data files to the new folder location, the software cannot find any data in the User folder, so it goes off and finds the data in the Programs folder and uses that instead. It appears that your data files have disappeared when in fact they are safely tucked up where you left them when using V5.7.
NB: It is worth noting that the update to V5.8 leaves the v5.7 install completely untouched and working as it always has.
Using your old data files
To get the new version working with your old data, you need to copy it from its current location, to the new location. For most people, this will mean copying the data from C:/AppliCad_User to C:/AppliCad/<program name>/User. This is a chance to tidy things up so I recommend that you do not simply copy every single file across to the new location.
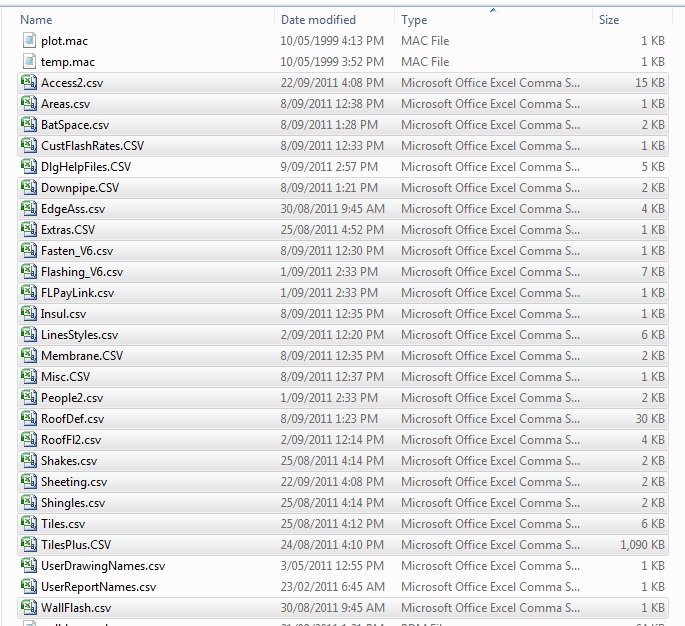
As a start, open Windows Explorer and sort the files into a list by Details. Then sort them by type. This makes it a lot easy to find the files to copy. Start by copying all files with a .csv extension to C:/AppliCad/<program name>/User. These will be your material data files. Then copy all files with a .dab extension to C:/AppliCad/<program name>/User. These are your roof models and job files.
You may also require a couple of .bin files if you’re doing labour and tiles and shingles – typically Tiles.bin, Tiles4.bin, MLabour5.bin, TLabour5.bin, Shingles.bin and Linestyles.bin.
To ensure that you do not get remnants of the sample data, I would also delete the sample data files from the Programs folder. Navigate to the C:/AppliCad/<program name>/Programs folder, sort the files by type and go down to the list of .csv files. Highlight all but DlgHelpFiles.csv, User ReportNames.csv and UserDrawingNames.csv, and delete them.
At some stage when you are satisfied with V5.8 and that you have everything you need where you need it, you will be able to archive the old data and jobs and delete the V5.7.
Network Situation
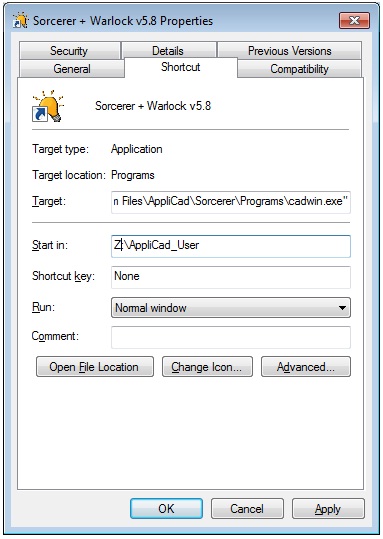
If you’re running a network and your data is on the network server, you need to delete the files as explained above, then tell the AppliCad software where to find the current data files. First you must right click on the short cut for V5.8, select Properties and set the ‘Start in’ location and click Apply.
Next start the software up by double clicking the short cut and go to Tools>More…>System Preferences and set the path for your files. Typically, both the User Folder and the Corporate Folder will be the same. Read the manual for more details on how to configure for a corporate setup.
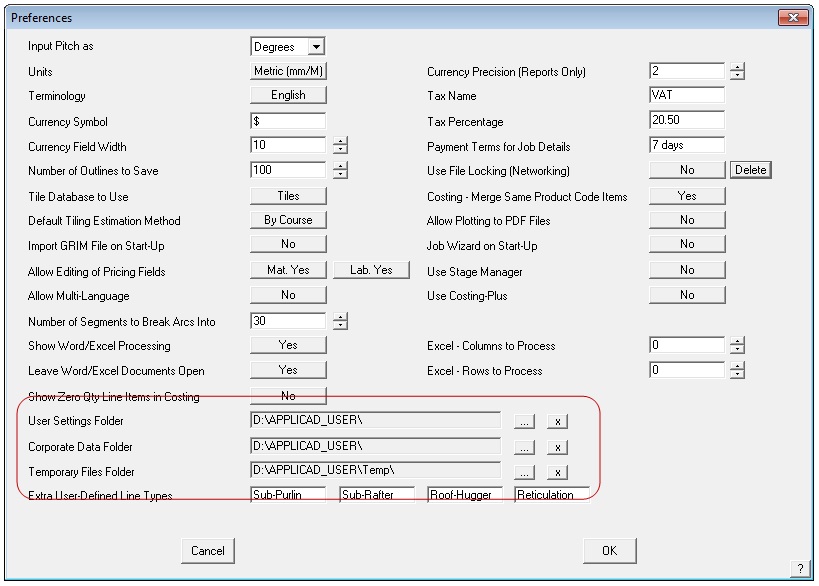
The Temporary folder is where transitory files such as all those pesky .bin files that are created by the software when jobs are costed etc are now stored. This allows easy cleanup periodically.
From here, you should be working as before, only with the new version of AppliCad. If you have any further questions, please drop our support team a line immediately.
We’re confident that the new version will deliver fantastic new features and a whole lot faster. Have fun.
Regards,
AppliCad Support Team